
Making mushroom “seeds” at home means creating viable starting material, like spore prints or liquid cultures. These are then used to grow mycelium, the vegetative part of the mushroom, which eventually produces the fruiting bodies we eat. This guide covers the main methods for home growers.
Understanding Mushroom Reproduction
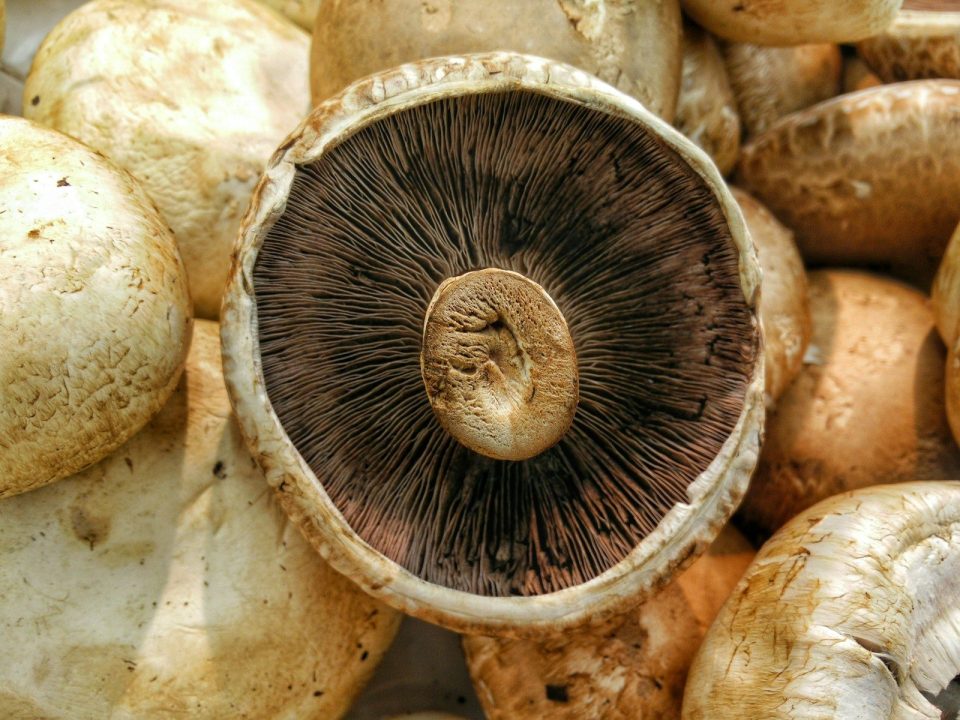
Before we dive into making your own mushroom starters, let’s quickly talk about how mushrooms actually grow. Think of a mushroom as the fruit of a much larger organism. That organism is called mycelium.
It’s like a fine white or colored network of threads that lives in the soil, wood, or whatever the mushroom is growing on. You usually don’t see it unless you dig around.
When it’s time to make more mushrooms, the mycelium releases tiny, microscopic things called spores. These are like the mushroom’s version of seeds. They float around in the air.
If a spore lands in a good spot with the right food, moisture, and temperature, it will start to grow. It sends out a little thread, and that thread connects with another spore’s thread. When they connect, they start to form a new mycelium network.
So, when we talk about making “mushroom seeds” at home, we’re really talking about capturing these spores or getting a head start on growing that mycelium. We’ll be using two main ways to do this: spore prints and liquid cultures. Both are excellent ways to get started with your mushroom growing adventure.
The Art of the Spore Print
A spore print is basically a collection of mushroom spores. You get it by letting a mushroom cap drop its spores onto a surface. It’s like taking a dusty impression.
This is a super important first step for many mushroom growers. It’s how you can save the genetics of a mushroom you really like. Think of it as creating your own mushroom library.
To make a spore print, you need a fresh mushroom. The mushroom should be mature, but not too old. When the cap is opening up and the gills underneath are exposed, that’s usually the best time.
You want to see that the gills are starting to look a little crowded. That means the mushroom is ready to drop lots of spores.
You will need a few things for this. First, get a clean piece of paper or foil. White paper works well because you can see the spores easily.
Some people like to use foil because it’s less porous. You also need a glass or a jar to cover the mushroom cap. This keeps air from blowing the spores away.
And, of course, you need your mushroom.
Carefully take your mushroom and place it on the paper or foil. Make sure the gills are facing down. Then, place the glass or jar over the mushroom.
This creates a little humid chamber and protects the spores. Now, you just have to wait. Leave it in a quiet place, away from drafts or vibrations.
This might take a few hours, or it could take overnight. It really depends on the mushroom and its maturity.
What you’re looking for is a colored dust on the paper under the cap. This dust is the mushroom spores. The color of the spores depends on the type of mushroom.
Some are white, some are brown, some are even black. This is why using contrasting paper helps. Once you see the spore deposit, you can carefully lift the cap.
You’ve made a spore print!
To store your spore print, you can gently fold the paper or cover the foil. It’s best to put it in a clean envelope or a small plastic bag. Label it with the mushroom type and the date.
You can store these spore prints in a cool, dry place. They can last for quite a while, sometimes for years, if kept properly.
Now, how do you use this spore print to grow mushrooms? This is where the magic really begins. You’ll take a tiny bit of that spore dust and put it into a sterile nutrient-rich liquid or gel.
This liquid culture is where the spores will germinate and start to grow into mycelium. It’s a delicate process, and sterility is key. We’ll talk more about that later.
Spore Print Essentials
What You Need:
- Fresh, mature mushroom
- Clean paper or foil
- Glass or jar
- Labeling materials
The Process:
- Place mushroom cap gill-side down on paper/foil.
- Cover with glass/jar.
- Wait for spore deposit (hours to overnight).
- Carefully remove cap.
- Store print in a labeled envelope/bag.
From Spore Print to Liquid Culture
Turning your spore print into a living culture is a rewarding next step. This is how you activate those tiny spores and start growing your own mushroom colony. The goal here is to get the spores to germinate in a sterile liquid environment.
This liquid will feed the growing mycelium. Sterility is the absolute most important thing at this stage. Any little germ floating around can take over your culture.
So, prepare for a bit of careful work.
You’ll need a sterile environment to work in. A clean kitchen counter wiped down with isopropyl alcohol can work, but a “still air box” is even better. A still air box is just a clear plastic tub with holes cut in the sides.
It helps keep airborne contaminants out while you work. You’ll also need sterile tools. This includes sterile syringes and sterile water.
First, you need to prepare your sterile liquid. Many growers use malt extract or honey dissolved in distilled water. A common ratio is about 2 tablespoons of malt extract per quart of water.
You boil this mixture to sterilize it. Then, let it cool completely. The cooling process is important.
You don’t want to put your spores into hot liquid, as it will kill them. You also don’t want to introduce any steam into your sterile working space when you’re pouring the liquid.
Next, you need to get some spores from your print into a sterile syringe. You can use a sterile needle or a tiny sterile tool to gently scrape a small amount of spore dust from your print. Then, carefully drop this into your sterile liquid in the syringe.
You might need to swirl the syringe gently to get the spores to mix. You’re not trying to get a ton of spores, just a few. Too many can sometimes overwhelm the liquid.
After you have the spores in the syringe, you’ll inject a small amount of this spore-filled liquid into your prepared sterile jars or bags of liquid culture medium. Seal them up quickly. You want to minimize exposure to the air.
Now comes the waiting game. Place these jars or bags in a warm, dark place. The ideal temperature is usually around 70-75°F (21-24°C).
Over the next week or two, you should start to see something happening. You might see tiny white threads, called hyphae, starting to grow from where you injected the liquid. This is the beginning of your mycelium.
It might look like a little wispy cloud at first.
As the mycelium grows, it will start to spread through the liquid. The liquid might become cloudy. You might see strings of mycelium forming.
If you see any unusual colors, like green, black, or pink mold, that’s contamination. Unfortunately, you’ll have to discard that culture. This is why sterility is so crucial.
Don’t get discouraged if your first try has some issues. It’s a learning process.
Once your liquid culture is nice and full of healthy mycelium, it’s ready to be used. You can use it to inoculate sterilized grain. This grain will then become “spawn,” which is the perfect food for growing mushrooms.
You’re essentially making a mushroom starter that’s much more robust than just spores. It’s like giving your mushroom seeds a head start in life.
Mycelial Grain Spawn: The Foundation
Grain spawn is like the workhorse of mushroom cultivation. It’s essentially sterilized grain that has been colonized by mushroom mycelium. This colonized grain is then used to “seed” a larger substrate, like composted straw or wood chips, where the mushrooms will eventually grow.
Making your own grain spawn is a big step towards self-sufficiency in growing mushrooms.
The process starts with choosing the right grain. Rye berries, wheat berries, and millet are common choices. They provide a good balance of nutrients for the mycelium.
Whatever grain you choose, it needs to be properly prepared. This means cleaning it thoroughly and then cooking it just right.
Cleaning the grain is simple. You just rinse it under cold water. You want to remove any dust or debris.
Then, you’ll soak the grain. Soaking rehydrates the grain and makes it easier for the mycelium to penetrate. The soaking time can vary, but usually, a few hours to overnight is good.
Some people prefer to boil the grain for a short period instead of soaking.
After soaking or boiling, you need to cook the grain. The goal is to soften the grain kernels without making them mushy. You want them to be just tender enough for the mycelium to grow into.
Overcooked grain can turn into a paste, which is bad for mushroom growth. Undercooked grain won’t be easily penetrated by the mycelium.
Once cooked, the grain needs to be drained very well. Any excess moisture is a breeding ground for bacteria and mold. Spread the grain out on clean towels or screens to let it dry for a bit.
It should feel dry to the touch, but still plump and hydrated inside.
Now comes the critical part: sterilization. You need to get rid of any competing organisms in the grain. This is usually done using a pressure cooker.
You place the cooked and drained grain into sterile jars or bags. These containers need to have a filter patch or a lid with a small hole that allows for gas exchange but keeps contaminants out. The pressure cooker cooks the grain at high heat and pressure, which kills off bacteria, mold spores, and other unwanted microbes.
After the grain is sterilized and has cooled completely, it’s time to inoculate it. This is where you introduce your mushroom culture to the sterile grain. You can use a liquid culture syringe or a small piece of colonized grain spawn from another batch.
If you’re using a liquid culture syringe, you’ll inject a few milliliters of the culture into the jar or bag of grain.
If you’re using colonized grain spawn, you’ll break up a small chunk of it and mix it into the sterile grain. The key is to introduce a small amount of healthy mycelium. You don’t want to add too much, as it can sometimes lead to contamination.
Again, sterility is paramount. Work in your still air box or a very clean environment.
After inoculation, you seal the jars or bags and place them in a warm, dark place. The ideal temperature is usually around 70-75°F (21-24°C). Over the next few weeks, you’ll see the white mycelium start to grow from the inoculation point and spread throughout the grain.
It will consume the grain, turning it into a solid mass of white, stringy growth.
You want the grain to be fully colonized. This means you can’t see any uncolonized grain kernels anymore. Sometimes, you’ll see little clumps of denser mycelium forming.
This is a good sign. Once fully colonized, your grain spawn is ready to be used to inoculate your bulk substrate. It’s a vital step that makes growing larger mushroom yields much more achievable.
Grain Spawn Checklist
Grain Options: Rye, Wheat, Millet
Preparation Steps:
- Clean grain
- Soak or boil
- Cook to tender but not mushy
- Drain very well
- Sterilize in pressure cooker
Inoculation: Use sterile liquid culture or colonized grain spawn.
Incubation: Warm (70-75°F), dark, 2-4 weeks.
Working with Spore Syringes
Spore syringes are one of the most common ways beginners get started with mushroom cultivation. They are essentially sterile syringes filled with sterile water that has mushroom spores mixed into it. Think of them as pre-packaged “mushroom seeds” ready to be used.
They offer a good balance of ease of use and the potential to grow a variety of mushrooms.
You can buy spore syringes online from reputable suppliers. These are usually made by reputable mycologists. They come with the spores of a specific mushroom species.
It’s important to get them from a trusted source. This ensures you’re getting viable spores of the correct species. Some suppliers even offer spore syringes for microscopy, which are for educational purposes only and not for cultivation.
When you receive your spore syringe, it will typically come with the syringe itself, a sterile needle, and a cap for the needle. The spores are suspended in sterile water inside the syringe. The water helps keep the spores hydrated and suspended, making them easier to inject.
The needle allows for precise application of the spore solution.
Using a spore syringe involves a similar process to inoculating grain or liquid cultures. First, you need to prepare your sterile substrate. This is often grain, but it can also be agar plates or even some liquid culture mediums.
The key is that your substrate must be sterile. Any contamination will compete with the spores and prevent them from growing.
Before you inject, you might want to warm the syringe slightly. You can do this by holding it in your hand for a few minutes. This helps the spores disperse evenly in the water.
Then, you attach the sterile needle. For maximum sterility, many growers will flame the needle. You do this by heating the needle tip with a lighter until it glows red.
Let it cool for a second before inserting it into your substrate.
Inject the spore solution into your sterile substrate. The amount you inject can vary. For a jar of grain spawn, a few milliliters is usually enough.
For agar plates, just a drop or two is needed. The goal is to introduce enough spores to get germination, but not so many that you overwhelm the substrate with competing organisms or too much moisture.
After injecting, seal your substrate container. If you’re using jars, put the lids back on tightly. If you’re using bags, seal them according to their design.
Then, place them in an appropriate incubation area. The temperature and light conditions will depend on the mushroom species you are growing. Most common edible mushrooms like this to be kept around 70-75°F (21-24°C) in the dark.
It’s important to understand that spores are like seeds – they are not a guarantee of growth. Not every spore will germinate. You might see signs of contamination before you see any mycelial growth.
It can take anywhere from a few days to several weeks for spores to germinate and show visible signs of mycelium. Patience is key when working with spores. If you don’t see anything after a month, or if you see contamination, it’s usually best to discard the substrate and start again with a fresh syringe.
The Role of Agar in Mushroom Cultivation
Agar is a nutrient-rich gel that’s commonly used in laboratories for growing bacteria and fungi. In mushroom cultivation, agar plates are incredibly useful tools. They allow you to grow and isolate pure cultures of mushroom mycelium.
This is a more advanced technique, but it’s very powerful for ensuring you have healthy, contaminant-free starting material.
Think of an agar plate as a sterile petri dish filled with a jelly-like substance. This “jelly” is made from agar powder and a nutrient broth, often with some sugar or malt extract added. You pour this mixture into sterile petri dishes.
Once it cools and solidifies, it creates a perfect surface for mycelium to grow on.
You can use agar in a few ways. One common method is to transfer a small piece of colonized grain spawn or a tiny bit of mycelium from a liquid culture onto an agar plate. The mycelium will then grow out from that point, spreading across the surface of the agar.
As it grows, you can observe its health and growth patterns.
Agar is also excellent for isolating desirable traits. If you have a mushroom that grows particularly fast or produces a lot of fruits, you can take a small sample of its mycelium from an agar plate and transfer it to a new plate. This lets you “clean up” your culture and ensure you’re growing the best genetics.
It’s like selecting the strongest seedlings in a garden.
Perhaps the most important use of agar for home growers is for contamination detection and isolation. When you inoculate with spores or introduce any new culture, you can put a small sample onto an agar plate first. If contaminants like mold or bacteria are present, they will typically grow much faster than mushroom mycelium on the agar.
You can easily spot these unwanted organisms. If you see contamination, you can simply discard the plate and save your other cultures.
If you do see contamination on an agar plate, you can sometimes “clean” the culture. This involves carefully cutting out a small piece of healthy-looking mycelium that is far away from the contaminated area. You then transfer this clean piece to a fresh agar plate.
This process might need to be repeated a few times to get a truly pure culture.
Once you have a healthy mycelial growth on an agar plate, you can use it to inoculate liquid cultures or grain spawn. You can cut a small wedge of the colonized agar and drop it into a sterile liquid culture jar. Or, you can cut it into small pieces and add it to sterilized grain.
This is a very reliable way to ensure you are starting with clean, vigorous mycelium.
Working with agar requires strict sterile technique. Just like with liquid cultures, any airborne contaminants can ruin your plates. Using a still air box is highly recommended for pouring agar and transferring cultures.
While it might seem like an extra step, mastering agar can significantly improve your success rates and the quality of your mushroom harvests.
Agar Plate Benefits
Purity: Isolate clean mycelium.
Observation: Study mycelial growth patterns.
Isolation: Select fast-growing or desirable strains.
Contamination Control: Easily spot and remove unwanted organisms.
Propagation: Create clean inoculants for grain or liquid cultures.
Sterility: The Unsung Hero
I cannot stress this enough: when you are working with mushroom spores, liquid cultures, or grain spawn, sterility is your absolute best friend. Imagine you’ve worked hard to collect spores or make a liquid culture. You’ve waited weeks, and finally, you see those beautiful white threads of mycelium.
Then, you notice a patch of fuzzy green stuff. That green stuff is mold, and it’s a disaster for your mushroom project.
Mold and bacteria are everywhere. They are in the air, on surfaces, and even on your own skin. They are tiny microscopic organisms that compete with mushroom mycelium for food and space.
If they get a head start, they will outgrow and kill your precious mycelium. This is a common reason why new growers get frustrated. They see contamination and think they’ve done something wrong with the mushroom itself, when often it’s just a battle against invisible competitors.
So, how do you fight this battle? You create a sterile environment. This means cleaning everything that will come into contact with your cultures.
Use rubbing alcohol (isopropyl alcohol) at 70% concentration. Wipe down your work surfaces, your tools, and the outside of your jars or bags. If you have a laminar flow hood or a still air box, use it.
These devices create a barrier against airborne contaminants.
When you’re working with syringes or transferring cultures, try to minimize the time your materials are exposed to open air. Work quickly and deliberately. If you’re using a flame to sterilize a needle, let it cool for a moment before touching anything.
You don’t want to introduce hot air or debris from the flame itself.
Gloves are also a good idea. Even if you wash your hands thoroughly, they can carry invisible bacteria. Wearing sterile gloves adds an extra layer of protection.
Some people also wear face masks to prevent respiratory droplets from contaminating their cultures.
Don’t be afraid of sterility. It might sound daunting, but it’s really about being mindful and taking a few extra precautions. Many of these steps are simple.
Cleaning surfaces, using sterile tools, and working in a draft-free area can make a huge difference. When you master sterility, you’ll see your success rates soar.
Using Your Mushroom “Seeds” to Grow
Once you have your spore print, liquid culture, or grain spawn ready, the exciting part is using them to grow actual mushrooms! This involves transferring your starter material to a substrate. The substrate is the food source that the mushroom mycelium will consume to grow and eventually produce mushrooms.
For many common edible mushrooms, like oyster mushrooms or shiitake, grain spawn is the preferred way to start. You would take your fully colonized grain spawn and mix it into a bulk substrate. Common bulk substrates include pasteurized straw, sawdust, coco coir, or a mixture of these.
The ratio of grain spawn to bulk substrate is important. Generally, a lower spawn rate means it takes longer to colonize but can sometimes lead to more robust growth.
The process of mixing grain spawn with bulk substrate is called “inoculation” or “spawning.” You want to do this in as clean an environment as possible. For bulk substrates like straw or sawdust, pasteurization is usually sufficient. This means heating them to a specific temperature for a set amount of time to kill off most competing organisms without killing off beneficial ones.
This is less stringent than the sterilization needed for grain.
After mixing the spawn and substrate in a container (like a grow bag or a tub), you seal it up and let the mycelium colonize the new material. This can take anywhere from one to several weeks, depending on the mushroom species and the substrate. You’ll see the white mycelial threads spreading through the substrate.
When the substrate is fully colonized, it’s time to introduce the mushrooms to fruiting conditions. This usually involves changing the environment. You might need to increase humidity, provide fresh air exchange, and introduce some light.
Different mushrooms have different needs. For example, oyster mushrooms love high humidity and lots of fresh air. Shiitake mushrooms might prefer a bit less humidity but still need good air exchange.
If you’re using liquid culture, you can inject it directly into sterilized grain or sometimes directly into a pre-prepared bulk substrate. This bypasses the spore stage and can lead to faster colonization times, assuming your liquid culture is strong and clean.
Using spore syringes directly onto agar is a great way to start. Once you have a clean mycelial culture growing on agar, you can then transfer that to liquid culture or grain spawn. This multi-step approach, while taking more time, often leads to a higher success rate, especially for beginners.
What You’ve Learned About Mushroom “Seeds”
It’s amazing how much there is to learn about growing mushrooms, isn’t it? We’ve covered how mushrooms reproduce, moving beyond the idea of simple “seeds” to understand spores and mycelium. You’ve learned the steps for making a spore print, a fundamental technique for collecting mushroom genetics.
We’ve explored how to turn those spores into living liquid cultures, which is like giving your mushroom starters a drink and a warm place to grow.
We also talked about grain spawn, the hearty foundation for many mushroom growing projects. This is where your starter culture gets enough food to begin colonizing a larger amount of substrate. You’ve seen how spore syringes are a convenient way to get started, and how agar plates offer a more controlled environment for growing and cleaning up cultures.
Most importantly, you’ve learned about sterility. It’s the single most critical factor in successfully growing mushrooms at home. Without a sterile environment, all your efforts can be undone by microscopic invaders.
When to Worry About Your Mushroom Cultures
It’s normal for mushroom growing to have a learning curve. You’ll encounter issues, and that’s okay! However, there are some signs that tell you it’s time to be concerned about your cultures.
The most obvious one is contamination. If you see any colors other than white, cream, or the natural color of your mushroom’s mycelium, it’s likely a problem.
Green, blue, black, pink, or red fuzzy patches are almost always mold. Bacterial contamination can sometimes look like slimy, wet patches, or a yellowish or brownish discoloration. If you see any of these, it’s usually best to discard the culture.
Trying to save contaminated cultures often leads to more problems down the line.
Another sign to watch for is slow or no growth. If you’ve inoculated a substrate and weeks go by with no visible signs of mycelium, it could mean your spores weren’t viable, your incubation temperature was too low, or there was some other factor hindering growth. Sometimes, a very small amount of moisture can prevent spores from germinating properly.
This is where using agar first can be helpful, as it shows you if your spores are viable before you inoculate larger batches.
If your liquid culture or grain spawn stops growing after initial colonization, this can also be a sign. It might indicate that the nutrients are depleted, or that the culture is struggling with a hidden contamination. A healthy, vigorous mycelium should continue to spread until it runs out of food or reaches the container’s edge.
It’s also important to pay attention to the smell. Healthy mushroom mycelium usually has a mild, earthy, or sometimes slightly sweet smell. If you notice a strong sour, rotten, or putrid odor, that’s a big red flag for bacterial contamination.
Trust your senses. If something smells off, it probably is.
Don’t get discouraged if you face contamination. Every grower does. The key is to learn from it.
Try to figure out what might have gone wrong. Was your sterile technique not strict enough? Was your incubation temperature off?
Was the spawn you purchased not healthy?
Understanding these warning signs helps you troubleshoot and improve your techniques. It’s all part of becoming a better mushroom grower. The goal is to create the best possible environment for your mushroom mycelium to thrive and outcompete any unwanted organisms.
Tips for Success with Mushroom “Seeds”
Here are some quick tips to help you succeed when making and using mushroom starters:
- Start Simple: Begin with easier-to-grow mushroom species like oyster mushrooms. They are more forgiving for beginners.
- Invest in Sterility: Get a good quality isopropyl alcohol (70%) and a decent pair of nitrile gloves. A still air box is a worthwhile investment if you plan to do this regularly.
- Label Everything: Every jar, bag, and plate should be clearly labeled with the species, date, and what’s inside. You’ll thank yourself later.
- Be Patient: Mushroom growing takes time. Spores especially can take a while to germinate. Don’t rush the process or assume failure too early.
- Keep Detailed Notes: Write down your recipes, temperatures, timings, and what you observe. This helps you learn what works and what doesn’t.
- Source Wisely: If buying spores or cultures, choose reputable suppliers. Check reviews and ask questions.
- Don’t Fear Failure: Contamination happens. It’s a learning opportunity. The best growers learn from their mistakes.
- Learn About Your Species: Each mushroom species has unique needs for incubation and fruiting. Research the specific requirements for what you’re growing.
Frequently Asked Questions About Mushroom “Seeds”
What exactly are mushroom “seeds”?
Mushroom “seeds” aren’t really seeds like plants have. They are microscopic spores that mushrooms release to reproduce. When starting mushrooms at home, we often use spore prints, liquid cultures, or grain spawn, which are all ways to propagate these spores or the resulting mycelium.
Can I really make mushroom seeds at home from store-bought mushrooms?
Yes, you can collect spores from many edible mushrooms bought at the grocery store (like oyster or shiitake) to create a spore print. However, it’s important to note that these might have been treated or might not be the best strains for cultivation. For best results, it’s recommended to get spores or cultures from reputable mushroom supply companies.
How long do mushroom spores last?
Mushroom spores can remain viable for many years, sometimes decades, if stored properly. The best way to store them is in a dry, cool, and dark place. A spore print sealed in an envelope or small container works well.
Viability decreases over time, so fresher is always better for faster germination.
Is it hard to make a liquid culture from a spore print?
Making a liquid culture requires strict sterile technique, which can be challenging for beginners. You need to prevent contamination from mold and bacteria. While not overly difficult, it demands precision and cleanliness.
Many growers start with spore syringes or pre-made liquid cultures before trying to make their own from scratch.
How do I know if my mushroom culture is contaminated?
Contamination usually shows up as fuzzy or slimy growth in colors other than white, cream, or the natural color of your mycelium. Common contaminants are green mold (Trichoderma), black mold, and various bacteria. If you see any of these, it’s best to discard the culture to prevent spreading it.
What’s the difference between spores and mycelium?
Spores are like the individual “seeds” that mushrooms release. They are dormant until they land in a suitable environment. Mycelium is the vegetative part of the mushroom, a network of fine threads that grows from germinating spores.
Mycelium is what absorbs nutrients and eventually forms the mushroom fruit body.
Can I use my homemade mushroom cultures to grow food mushrooms?
Yes, absolutely! Once you have successfully created a viable spore print, liquid culture, or grain spawn from edible mushroom species, you can use it to inoculate substrates like grain, sawdust, straw, or compost. With the right conditions, these will grow into the mushrooms you can eat.
The Journey of a Mushroom Grower
Embarking on the path of growing your own mushrooms is a truly rewarding experience. It starts with understanding these fundamental steps of creating your own starter cultures, your mushroom “seeds.” From the simple act of making a spore print to the more involved processes of liquid cultures and grain spawn, each stage brings you closer to harvesting your own delicious fungi.
Remember, patience and meticulous sterility are your greatest allies. Don’t be discouraged by initial challenges; they are part of the learning process. Every successful harvest is a testament to your growing knowledge and care.
Enjoy the journey of cultivating these amazing organisms right in your own home!
},
},
},
},
},
},
} ] }